I See Spheres Now
by Jan Kelemen
Since I had never actually written a raytracer, I wanted to learn about this topic by following along with the popular Ray Tracing in One Weekend book. The title doesn’t lie, my first CPU raytracer did take only one weekend.
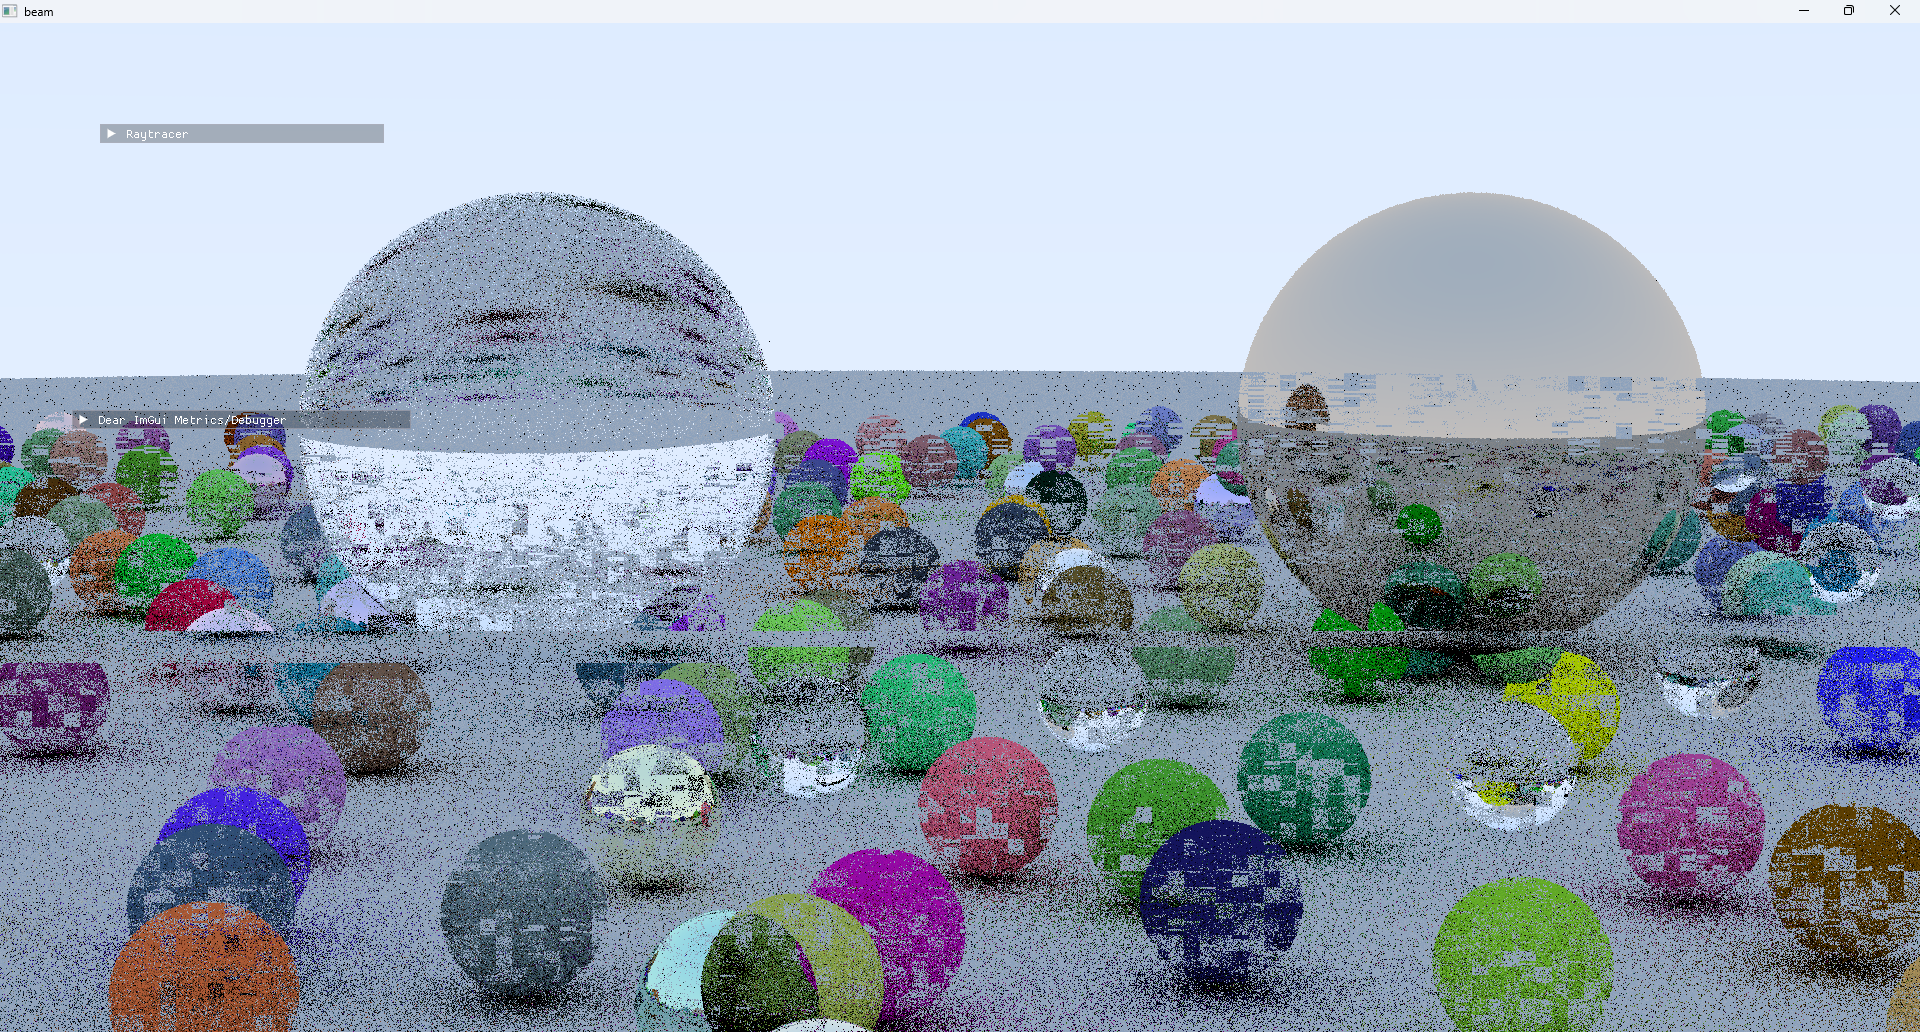
Afterward, I tried making the same raytracer using a compute shader and with the possibility to move around the scene in real time. Results are in the video below, link to the source code: jan-kelemen/beam
Spheres and materials are generated on the CPU and passed to the compute shader via storage buffers.
struct Sphere
{
    vec3 center;
    float radius;
    uint material;
};

layout(std430, binding = 1) readonly buffer WorldBuffer {
    Sphere spheres[];
} world;
Current implementation runs between [30, 200) FPS on my PC in full screen resolution, depending on the view of the world. To produce a clear picture usually, several samples per pixel are needed, this can either be done in a single frame or multiple frames by accumulating the color results. At full screen resolution doing multiple samples per pixel and preserving the real time aspect isn’t an option without doing some optimizations like bounding volume hierarchies. So I went with accumulating the color results into an image and computing one sample per frame.
// Load color information from previous frames
vec4 color = imageLoad(image, texelCoord) * pc.totalSamples;

for (uint i = 0; i != pc.samplesPerPixel; ++i) {
    Ray r = getRay(texelCoord, pc.cameraPosition, pixel00, pixelDeltaU, pixelDeltaV, defocusDiskU, defocusDiskV);
    color += rayColor(r);
}

// Store new color information updated by pc.samplesPerPixel steps
imageStore(image, texelCoord, color / (pc.totalSamples + pc.samplesPerPixel));
This is the reason why the image appears noisy when the camera is moving, only one sample is rendered before the image is presented on the screen. For lower resolutions, it’s possible to increase the sample count in the debug UI for the raytracer.
Another important aspect of a raytracer is how many bounces of a ray are performed. Ray bounces occur when a ray hits an object in the scene and reflects in some other direction from the object. The number of bounces needed to get a good picture of a scene depends on the scene being rendered, in this case, I found 5 to 10 gives an ok result, with more than that having diminishing returns.
Ray bounces and image sampling require a bit of random numbers, unlike CPU’s getting random numbers on a graphics card is not that easy like calling std::random_device.
Luckily, true randomness isn’t needed, so using a pseudorandom number generator like demonstrated in Hash Functions for GPU Rendering is ok in this case.
In the compute shader, the PRNG is seeded by a randomly generated seed received from the CPU and offset by the pixel coordinates:
uint rng_state = pc.frameSeed + texelCoord.x + texelCoord.y * imageSize.y;
The compute shader accumulates the results to an offscreen buffer, using a swap chain image directly isn’t applicable in this case since it needs to preserve the information from the previous frame, but the swap chain images are cycled.
So on each frame, the offscreen buffer is copied to the swap chain image used by the current frame, using vkCmdBlitImage.
vkCmdBlitImage(command_buffer,
color_image_.image,
VK_IMAGE_LAYOUT_TRANSFER_SRC_OPTIMAL,
target_image.image,
VK_IMAGE_LAYOUT_TRANSFER_DST_OPTIMAL,
1,
®ion,
VK_FILTER_NEAREST);
This is a very similar process that would be needed to take a screenshot of the application, just done in reverse.
Some people liked the glitch effect I accidentally made by using the wrong bounds in the ray test.
niku engine improvements
niku gets a permanent home now on jan-kelemen/niku!
I’ll have to improve the device selection code, currently, the first suitable match is taken as a used device.
auto const device_it{std::ranges::find_if(devices,
    [&context, &device_indices](auto const& device) mutable {
        return is_device_suitable(device, context.surface, device_indices);
    })};
This might not be the desired device, as the first one listed could be a CPU rasterizer like LLVMpipe, which is most likely not the desired one. I plan on making this configurable from the UI so that the device selection heuristics can be overridden by the user.
Compute pipelines
The main improvement to the rendering engine done for this project was the addition of support for the compute pipelines. I’ve used a builder pattern similar to what I already had for graphics pipelines. The example below shows setting up the compute shader raytracer.
compute_pipeline_ = std::make_unique<vkrndr::vulkan_pipeline>(
    vkrndr::vulkan_compute_pipeline_builder{device_,
        vkrndr::vulkan_pipeline_layout_builder{device_}
            .add_descriptor_set_layout(descriptor_layout_)
            .add_push_constants(VkPushConstantRange{
                .stageFlags = VK_SHADER_STAGE_COMPUTE_BIT,
                .offset = 0,
                .size = sizeof(push_constants),
            })
            .build()}
        .with_shader("raytracer.comp.spv", "main")
        .build());
Shader debugging
Shaders are now compiled with debug symbols, this allows debugging of shaders from RenderDoc or from NVIDIA Nsight Graphics.
This is achieved by adding -g flag to the shader compilation command, an excerpt from CMake used to compile shaders is below.
${GLSLC_EXE}
    $<$<OR:$<CONFIG:RelWithDebInfo>,$<CONFIG:Release>>:-O> # Optimize in RelWithDebInfo and Release
    $<$<OR:$<CONFIG:Debug>,$<CONFIG:RelWithDebInfo>>:-g> # Add debug information in Debug or RelWithDebInfo
    ${GLSLC_SHADER_SHADER} -o ${GLSLC_SHADER_SPIRV}
Other news
I’ve added support for compiling with libc++ to cpp-starter-template.
It is supported on x86-64 and AArch64 architectures. Currently, it’s not possible to set it up in the CI configuration for AArch64.
This configuration requires APT packages for arm64 architecture, which I found to be a pain to set up on the ubuntu-24.04 runners.
Existing APT sources on these runners aren’t limited to i386 and amd64 architectures, so if one tries to add an arm64 architecture to dpkg, the apt update command fails afterward.
Considering that the APT sources are now defined in deb822 format, makes it a bit more complicated than the sed approach that worked on older runners taken by some other projects online.
Types: deb
URIs: http://azure.archive.ubuntu.com/ubuntu/
Suites: noble-security
Components: main universe restricted multiverse
signed-By: /usr/share/keyrings/ubuntu-archive-keyring.gpg
A line like the one below should be added to all of the APT sources before adding repositories for AArch64 architecture. I didn’t yet find a reliable way to do this.
Architectures: amd64 i386
Nevertheless using Clang 18 with libc++ I compiled and ran an early version of the raytracer on a Raspberry Pi 5.
Although it did pick the CPU rasterizer, due to the previously mentioned issue in device selection, the framerate was bad.
Adding support for clang-cl frontend on Windows is still on a TODO list for that project, along with install targets and symbol stripping.
Final words
At one point in time I also want to go over Ray Tracing: The Next Week and Ray Tracing: The Rest of Your Life books, as well as adding support for ray tracing pipelines.
For any questions or corrections to this post, contact me via email at jkeleme@gmail.com.
Previous posts in the series:
- Rendering Medvednica From a Heightmap
- It Goes In The Square Hole
- Chess engine visualization
- Remaking World 1-1 with Vulkan, mostly